Showing posts with label Arduino LED display. Show all posts

29 August, 2015

Arduino: print sensor value on the LED display

It is pretty simple to print a value from an analog sensor on the LED display.

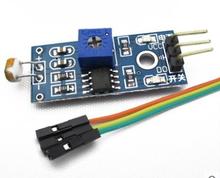
For example from a light sensor like here:

Output light sensor value to led display

and when the sensor is out of light:

Output light sensor value to led display (closed)

Electronic components from the scheme above:

LED display is connected with Arduino via these 5 pins:

  • DIN - data in
  • CS - chip select
  • CLK - clock pulse source
  • GND
  • 5 V

DIN, CS and CLK are connected with Arduino via digital pins 7, 6 and 5.

Light sensor has 3 pins:

  • GND
  • 5V
  • Signal

where signal pin is connected with Arduino via the analog pin №1.

This program reads values from the sensor 10 times per second and displays the averaged result:

#include <LedControl.h>

const int DIN_PIN = 7;
const int CS_PIN = 6;
const int CLK_PIN = 5;

const int SENSOR_PIN = 1;

LedControl display = LedControl(DIN_PIN, CLK_PIN, CS_PIN);

void setup() {
  display.clearDisplay(0);
  display.shutdown(0, false);
  display.setIntensity(0, 10);
}

void displayNumber(int number) {
  display.clearDisplay(0);
  for (int i = 0; i < 8; i++) {
    int digit = number % 10;
    number /= 10;
    display.setDigit(0, i, digit, false);
    if (number == 0) {
      break;
    }
  }
}

void loop() {
  int value = 0;
  for (int i = 0; i < 10; i++) {
    value += analogRead(SENSOR_PIN);
    delay(100);
  }
  value /= 10;

  displayNumber(value);
}

22 July, 2015

Arduino: output multiple numbers to a digital LED display

In the previous article I was describing how to output number into this LED display:

But it is much interesting to display multiple numbers on a single LED module (for example: temperature and moisture or distance and time). It is pretty simple to write it in C.

Like in a previous example DIN, CS and CLK are connected with arduino through these pins: 7, 6 and 5. Here is the working prototype:

Output 2 numbers to led display

In this example are implemented two counters: 2-digits, and 5-digits. The first counter increments from 0 to 99, and then resets on reaching the maximum values. The second - reduces from 99999 to 0, and resets after the zero. In each cycle a digital display shows both numbers at the same time, with an empty place as a separator between them.

Code sample:

#include <LedControl.h>

const int DIN_PIN = 7;
const int CS_PIN = 6;
const int CLK_PIN = 5;

LedControl display = LedControl(DIN_PIN, CLK_PIN, CS_PIN);

void setup() {
  display.clearDisplay(0);
  display.shutdown(0, false);
  display.setIntensity(0, 10);
}

void displayString(const char *chars8) {
  display.clearDisplay(0);
  for (int i = 0; i < 8 && chars8[i] != 0; i++) {
    display.setChar(0, 7 - i, chars8[i], false);
  }
}

int counter1 = 0;
long counter2 = 99999;

char chars[9] = {};

void loop() {
  snprintf(chars, 9, "%-2d %5ld", counter1, counter2);
  displayString(chars);

  counter1++;
  counter2--;

  if (counter1 > 99) {
    counter1 = 0;
  }

  if (counter2 < 0) {
    counter2 = 99999;
  }

  delay(250);
}

In this example two numbers are packed into the char array and then displayed via the displayString() function. I use snprintf() function for this; it is much safe then sprintf().

The first number is aligned on the left edge of the display, the second - on the right.

This code requires LedControl library.

Set of components used in this example:

20 July, 2015

Arduino: output number into digital LED display MAX7219

There are some LED modules for Arduino to display numbers.

For example, this LED display with 8-digits based on the chip MAX7219:

It connects to the Arduino board via five pins:

  1. DIN - data in
  2. CS - chip select
  3. CLK - clock pulse source
  4. GND
  5. 5 V

In this example all elements are connected in this way:

Output number to led display

Here DIN, CS and CLK are connected with pins 7, 6 and 5.

Arduino site has a big LedControl article related to control over the LED matrix. But it doesn't contain a sample that shows how to output whole number.

The code below implements a simple counter, which increases its value once per second and displays it on a digital display:

#include <LedControl.h>

const int DIN_PIN = 7;
const int CS_PIN = 6;
const int CLK_PIN = 5;

LedControl display = LedControl(DIN_PIN, CLK_PIN, CS_PIN);

void setup() {
  display.clearDisplay(0);
  display.shutdown(0, false);
  display.setIntensity(0, 10);
}

void displayString(const char *chars8) {
  display.clearDisplay(0);
  for (int i = 0; i < 8 && chars8[i] != 0; i++) {
    display.setChar(0, 7 - i, chars8[i], false);
  }
}

int counter1 = 0;
long counter2 = 99999;

char chars[9] = {};

void loop() {
  snprintf(chars, 9, "%-2d %5ld", counter1, counter2);
  displayString(chars);

  counter1++;
  counter2--;

  if (counter1 > 99) {
    counter1 = 0;
  }

  if (counter2 < 0) {
    counter2 = 99999;
  }

  delay(250);
}

In this code I use displayNumber() function, that writes value for each decimal digit into the appropriate LED segment.

This code requires LedControl library.

Electronic components used in this example: