28 September, 2015

Arduino: store 64-bit integers in PROGMEM

Nowadays developers don't think about bits, bytes or kilobytes.

How much memory is allocated for the object? Who the hell cares?!

Honestly speaking, modern software does fairly simple things, but it requires gigabytes of memory; much more than they actually needed.

But with Arduino each byte is under control. And I like it. Simple programs works in a simple way and requires reasonable amount of resources.

Modern Arduino (based on ATmega328P) has:

  • 2 KB of RAM
  • 32 KB of Flash
  • 1KB of EEPROM

Much enough memory for good program )

It is possible to store the data in the Flash area via the PROGMEM modifier in the code. If you going to use the data from the Flash (PROGMEM) then you have to read it back into RAM.

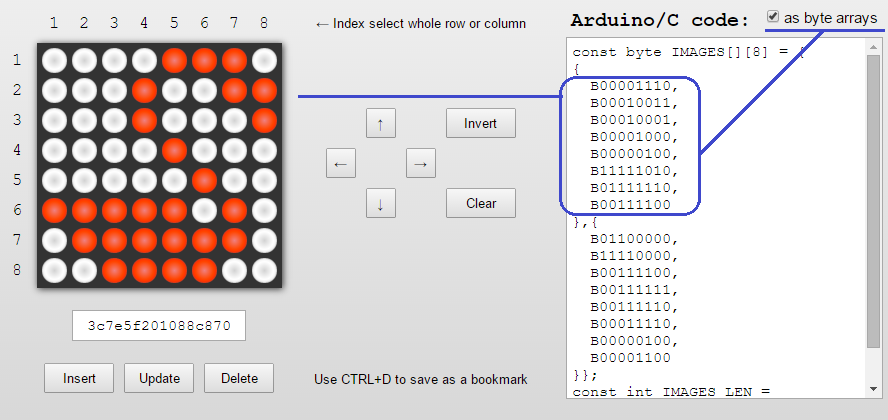
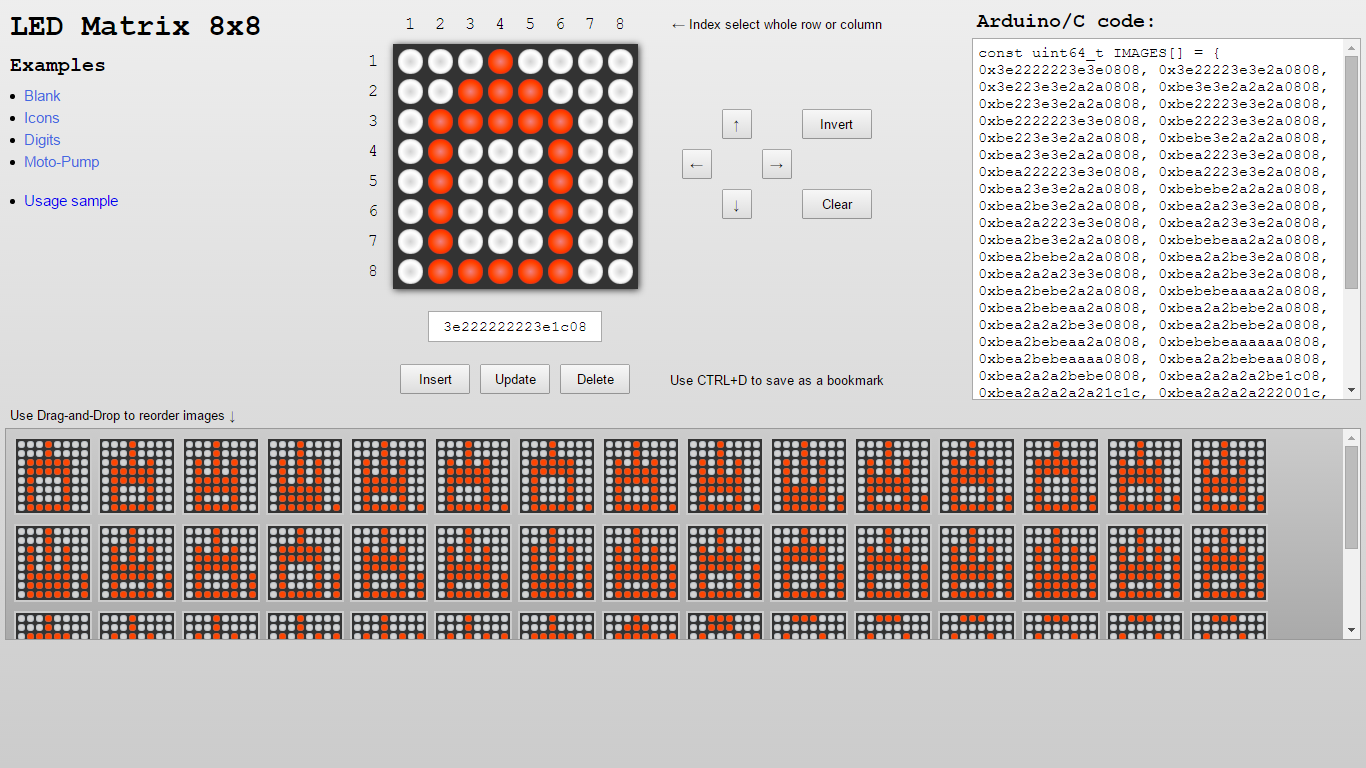
I found it useful to keep 8x8 animation (created using the LED Matrix Editor) for LED dot matrix in the Flash instead of RAM. In my program each image is a 64-bit unsigned integer (uint64_t); an animation - is a series of these images.

How to store an array of uint64_t in PROGMEM:

const uint64_t IMAGES[] PROGMEM = {
  0x0000000000000000,
  0x7c92aa82aa827c00,
  0x7ceed6fed6fe7c00,
...
};

How to read single(i) uint64_t from the array from PROGMEM:

  uint64_t image;
  memcpy_P(&image, &IMAGES[i], 8);

  displayImage(image);

Just copy 8 (single uint64_t) bytes from the Flash to RAM.

Two sketches below show the small differences in the code, but big difference in memory usage.

Store images in the RAM:

#include <LedControl.h>

const int DIN_PIN = 7;
const int CS_PIN = 6;
const int CLK_PIN = 5;

const uint64_t IMAGES[] = {
  0x0000000000000000,
  0x7c92aa82aa827c00,
  0x7ceed6fed6fe7c00,
  0x10387cfefeee4400,
  0x10387cfe7c381000,
  0x381054fe54381000,
  0x38107cfe7c381000,
  0x00387c7c7c380000,
  0xffc7838383c7ffff,
  0x0038444444380000,
  0xffc7bbbbbbc7ffff,
  0x0c12129ca0c0f000,
  0x38444438107c1000,
  0x060e0c0808281800,
  0x066eecc88898f000,
  0x105438ee38541000,
  0x061e7efe7e1e0600,
  0xc0f0fcfefcf0c000,
  0x1038541054381000,
  0x6666006666666600,
  0xa0a0a0bca6a6fc00,
  0x0c324824124c3000,
  0xfefefe0000000000,
  0x7c38541054381000,
  0x383838fe7c381000,
  0x10387cfe38383800,
  0x10307efe7e301000,
  0x1018fcfefc181000,
  0xfefe0e0e0e000000,
  0x002844fe44280000,
  0xfefe7c7c38381000,
  0x1038387c7cfefe00,
  0x0000000000000000,
  0x180018183c3c1800,
  0x00000000286c6c00,
  0x6c6cfe6cfe6c6c00,
  0x103c403804781000,
  0x60660c1830660600,
  0xfc66a6143c663c00,
  0x0000000c18181800,
  0x060c1818180c0600,
  0x6030181818306000,
  0x006c38fe386c0000,
  0x0010107c10100000,
  0x060c0c0c00000000,
  0x0000003c00000000,
  0x0606000000000000,
  0x00060c1830600000,
  0x3c66666e76663c00,
  0x7e1818181c181800,
  0x7e060c3060663c00,
  0x3c66603860663c00,
  0x30307e3234383000,
  0x3c6660603e067e00,
  0x3c66663e06663c00,
  0x1818183030667e00,
  0x3c66663c66663c00,
  0x3c66607c66663c00,
  0x0018180018180000,
  0x0c18180018180000,
  0x6030180c18306000,
  0x00003c003c000000,
  0x060c1830180c0600,
  0x1800183860663c00,
  0x003c421a3a221c00,
  0x6666667e66663c00,
  0x3e66663e66663e00,
  0x3c66060606663c00,
  0x3e66666666663e00,
  0x7e06063e06067e00,
  0x0606063e06067e00,
  0x3c66760606663c00,
  0x6666667e66666600,
  0x3c18181818183c00,
  0x1c36363030307800,
  0x66361e0e1e366600,
  0x7e06060606060600,
  0xc6c6c6d6feeec600,
  0xc6c6e6f6decec600,
  0x3c66666666663c00,
  0x06063e6666663e00,
  0x603c766666663c00,
  0x66361e3e66663e00,
  0x3c66603c06663c00,
  0x18181818185a7e00,
  0x7c66666666666600,
  0x183c666666666600,
  0xc6eefed6c6c6c600,
  0xc6c66c386cc6c600,
  0x1818183c66666600,
  0x7e060c1830607e00,
  0x7818181818187800,
  0x006030180c060000,
  0x1e18181818181e00,
  0x0000008244281000,
  0xfe00000000000000,
  0x0000000060303000,
  0x7c667c603c000000,
  0x3e66663e06060600,
  0x3c6606663c000000,
  0x7c66667c60606000,
  0x3c067e663c000000,
  0x0c0c3e0c0c6c3800,
  0x3c607c66667c0000,
  0x6666663e06060600,
  0x3c18181800180000,
  0x1c36363030003000,
  0x66361e3666060600,
  0x1818181818181800,
  0xd6d6feeec6000000,
  0x6666667e3e000000,
  0x3c6666663c000000,
  0x06063e66663e0000,
  0xf0b03c36363c0000,
  0x060666663e000000,
  0x3e403c027c000000,
  0x1818187e18180000,
  0x7c66666666000000,
  0x183c666600000000,
  0x7cd6d6d6c6000000,
  0x663c183c66000000,
  0x3c607c6666000000,
  0x3c0c18303c000000,
  0x7018180c18187000,
  0x1818180018181800,
  0x0e18183018180e00,
  0x000000365c000000,
  0xfe8282c66c381000
};
const int IMAGES_LEN = sizeof(IMAGES)/8;


LedControl display = LedControl(DIN_PIN, CLK_PIN, CS_PIN);


void setup() {
  display.clearDisplay(0);
  display.shutdown(0, false);
  display.setIntensity(0, 10);
}

void displayImage(uint64_t image) {
  for (int i = 0; i < 8; i++) {
    byte row = (image >> i * 8) & 0xFF;
    for (int j = 0; j < 8; j++) {
      display.setLed(0, i, j, bitRead(row, j));
    }
  }
}

int i = 0;

void loop() {
  uint64_t image = IMAGES[i];

  displayImage(image);
  if (++i >= IMAGES_LEN ) {
    i = 0;
  }
  delay(1000);
}

Sketch uses 3,424 bytes (10%) of program storage space.
Maximum is 32,256 bytes.
Global variables use 1,123 bytes (54%) of dynamic memory,
leaving 925 bytes for local variables. Maximum is 2,048 bytes.

Store images on the Flash:

#include <LedControl.h>

const int DIN_PIN = 7;
const int CS_PIN = 6;
const int CLK_PIN = 5;

const uint64_t IMAGES[] PROGMEM = {
  0x0000000000000000,
  0x7c92aa82aa827c00,
  0x7ceed6fed6fe7c00,
  0x10387cfefeee4400,
  0x10387cfe7c381000,
  0x381054fe54381000,
  0x38107cfe7c381000,
  0x00387c7c7c380000,
  0xffc7838383c7ffff,
  0x0038444444380000,
  0xffc7bbbbbbc7ffff,
  0x0c12129ca0c0f000,
  0x38444438107c1000,
  0x060e0c0808281800,
  0x066eecc88898f000,
  0x105438ee38541000,
  0x061e7efe7e1e0600,
  0xc0f0fcfefcf0c000,
  0x1038541054381000,
  0x6666006666666600,
  0xa0a0a0bca6a6fc00,
  0x0c324824124c3000,
  0xfefefe0000000000,
  0x7c38541054381000,
  0x383838fe7c381000,
  0x10387cfe38383800,
  0x10307efe7e301000,
  0x1018fcfefc181000,
  0xfefe0e0e0e000000,
  0x002844fe44280000,
  0xfefe7c7c38381000,
  0x1038387c7cfefe00,
  0x0000000000000000,
  0x180018183c3c1800,
  0x00000000286c6c00,
  0x6c6cfe6cfe6c6c00,
  0x103c403804781000,
  0x60660c1830660600,
  0xfc66a6143c663c00,
  0x0000000c18181800,
  0x060c1818180c0600,
  0x6030181818306000,
  0x006c38fe386c0000,
  0x0010107c10100000,
  0x060c0c0c00000000,
  0x0000003c00000000,
  0x0606000000000000,
  0x00060c1830600000,
  0x3c66666e76663c00,
  0x7e1818181c181800,
  0x7e060c3060663c00,
  0x3c66603860663c00,
  0x30307e3234383000,
  0x3c6660603e067e00,
  0x3c66663e06663c00,
  0x1818183030667e00,
  0x3c66663c66663c00,
  0x3c66607c66663c00,
  0x0018180018180000,
  0x0c18180018180000,
  0x6030180c18306000,
  0x00003c003c000000,
  0x060c1830180c0600,
  0x1800183860663c00,
  0x003c421a3a221c00,
  0x6666667e66663c00,
  0x3e66663e66663e00,
  0x3c66060606663c00,
  0x3e66666666663e00,
  0x7e06063e06067e00,
  0x0606063e06067e00,
  0x3c66760606663c00,
  0x6666667e66666600,
  0x3c18181818183c00,
  0x1c36363030307800,
  0x66361e0e1e366600,
  0x7e06060606060600,
  0xc6c6c6d6feeec600,
  0xc6c6e6f6decec600,
  0x3c66666666663c00,
  0x06063e6666663e00,
  0x603c766666663c00,
  0x66361e3e66663e00,
  0x3c66603c06663c00,
  0x18181818185a7e00,
  0x7c66666666666600,
  0x183c666666666600,
  0xc6eefed6c6c6c600,
  0xc6c66c386cc6c600,
  0x1818183c66666600,
  0x7e060c1830607e00,
  0x7818181818187800,
  0x006030180c060000,
  0x1e18181818181e00,
  0x0000008244281000,
  0xfe00000000000000,
  0x0000000060303000,
  0x7c667c603c000000,
  0x3e66663e06060600,
  0x3c6606663c000000,
  0x7c66667c60606000,
  0x3c067e663c000000,
  0x0c0c3e0c0c6c3800,
  0x3c607c66667c0000,
  0x6666663e06060600,
  0x3c18181800180000,
  0x1c36363030003000,
  0x66361e3666060600,
  0x1818181818181800,
  0xd6d6feeec6000000,
  0x6666667e3e000000,
  0x3c6666663c000000,
  0x06063e66663e0000,
  0xf0b03c36363c0000,
  0x060666663e000000,
  0x3e403c027c000000,
  0x1818187e18180000,
  0x7c66666666000000,
  0x183c666600000000,
  0x7cd6d6d6c6000000,
  0x663c183c66000000,
  0x3c607c6666000000,
  0x3c0c18303c000000,
  0x7018180c18187000,
  0x1818180018181800,
  0x0e18183018180e00,
  0x000000365c000000,
  0xfe8282c66c381000
};
const int IMAGES_LEN = sizeof(IMAGES)/8;


LedControl display = LedControl(DIN_PIN, CLK_PIN, CS_PIN);


void setup() {
  display.clearDisplay(0);
  display.shutdown(0, false);
  display.setIntensity(0, 10);
}

void displayImage(uint64_t image) {
  for (int i = 0; i < 8; i++) {
    byte row = (image >> i * 8) & 0xFF;
    for (int j = 0; j < 8; j++) {
      display.setLed(0, i, j, bitRead(row, j));
    }
  }
}

int i = 0;

void loop() {
  uint64_t image;
  memcpy_P(&image, &IMAGES[i], 8);

  displayImage(image);
  if (++i >= IMAGES_LEN ) {
    i = 0;
  }
  delay(1000);
}

Sketch uses 3,470 bytes (10%) of program storage space.
Maximum is 32,256 bytes.
Global variables use 99 bytes (4%) of dynamic memory,
leaving 1,949 bytes for local variables. Maximum is 2,048 bytes.

As you can see - the second (PROGMEM) program uses more than 10 times less RAM memory than the first.

19 September, 2015

Arduino: LED Matrix state as array of bytes

Recently I released and have written about Arduino: LED Matrix Editor

This is online editor for LED dot matrices, that helps people to make animations and save them as C-code for Arduino. In that version was only option to save matrices as unsigned 64-bit integers (uint64_t). I prefer this form as the most compact representation of the 8x8 matrix.

However some people experiencing problems with uint64_t data type (due to limitation in their software or hardware). In order to support this case (and make them happy) I just added a new option to save images as arrays of bytes in binary form:

LED Matrix as byte array

Generated arrays take much more lines of code. But, nevertheless, they are more evident.

Here is a sample how to animate matrix using this code:

#include <LedControl.h>

const int DIN_PIN = 7;
const int CS_PIN = 6;
const int CLK_PIN = 5;

const byte IMAGES[][8] = {
  {
    B00010000,
    B00110000,
    B00010000,
    B00010000,
    B00010000,
    B00010000,
    B00010000,
    B00111000
  }, {
    B00111000,
    B01000100,
    B00000100,
    B00000100,
    B00001000,
    B00010000,
    B00100000,
    B01111100
  }, {
    B00111000,
    B01000100,
    B00000100,
    B00011000,
    B00000100,
    B00000100,
    B01000100,
    B00111000
  }, {
    B00000100,
    B00001100,
    B00010100,
    B00100100,
    B01000100,
    B01111100,
    B00000100,
    B00000100
  }, {
    B01111100,
    B01000000,
    B01000000,
    B01111000,
    B00000100,
    B00000100,
    B01000100,
    B00111000
  }, {
    B00111000,
    B01000100,
    B01000000,
    B01111000,
    B01000100,
    B01000100,
    B01000100,
    B00111000
  }, {
    B01111100,
    B00000100,
    B00000100,
    B00001000,
    B00010000,
    B00100000,
    B00100000,
    B00100000
  }, {
    B00111000,
    B01000100,
    B01000100,
    B00111000,
    B01000100,
    B01000100,
    B01000100,
    B00111000
  }, {
    B00111000,
    B01000100,
    B01000100,
    B01000100,
    B00111100,
    B00000100,
    B01000100,
    B00111000
  }, {
    B00111000,
    B01000100,
    B01000100,
    B01000100,
    B01000100,
    B01000100,
    B01000100,
    B00111000
  }
};

const int IMAGES_LEN = sizeof(IMAGES) / 8;

LedControl display = LedControl(DIN_PIN, CLK_PIN, CS_PIN);

void setup() {
  display.clearDisplay(0);
  display.shutdown(0, false);
  display.setIntensity(0, 5);
}

void displayImage(const byte* image) {
  for (int i = 0; i < 8; i++) {
    for (int j = 0; j < 8; j++) {
      display.setLed(0, i, j, bitRead(image[i], 7 - j));
    }
  }
}

int i = 0;

void loop() {
  displayImage(IMAGES[i]);
  if (++i >= IMAGES_LEN ) {
    i = 0;
  }
  delay(333);
}

Animation video:

12 September, 2015

Arduino: LED Matrix Editor

I would like to introduce my new mini-project LED Matrix Editor created for the Arduino community.

This is online tool for editing and creating animations for LED dot matrices.

LED Matrix Editor screenshot

It looks very simple, but it has some handy features:

  • Toggle LEDs using a mouse
  • Toggle a whole row or column by clicking the appropriate matrix's index
  • Shift the matrix Up, Down, Left or Right via the single click
  • Invert or Clear matrix
  • Collect matrices in the bottom pane and then reorder them using the Drag-and-Drop
  • Update images as well as insert new or delete existing
  • Save images as a C code for Arduino
  • Use browsing history and save images as a link or bookmark, so you never lost your creations

I hope you will be fun and happy using it.

Assume you have a matrix (based on a board with MAX7219) like this:

*This chip it is really cool and there is a good LedControl library for Arduino for this chip.

Then you have created an animation using the online editor, copied and pasted generated code to the Arduino IDE:

#include <LedControl.h>

const int DIN_PIN = 7;
const int CS_PIN = 6;
const int CLK_PIN = 5;

const uint64_t IMAGES[] = {
  0x3e2222223e3e0808, 0x3e22223e3e2a0808, 0x3e223e3e2a2a0808, 0xbe3e3e2a2a2a0808,
  0xbe223e3e2a2a0808, 0xbe22223e3e2a0808, 0xbe2222223e3e0808, 0xbe22223e3e2a0808,
  0xbe223e3e2a2a0808, 0xbebe3e2a2a2a0808, 0xbea23e3e2a2a0808, 0xbea2223e3e2a0808,
  0xbea222223e3e0808, 0xbea2223e3e2a0808, 0xbea23e3e2a2a0808, 0xbebebe2a2a2a0808,
  0xbea2be3e2a2a0808, 0xbea2a23e3e2a0808, 0xbea2a2223e3e0808, 0xbea2a23e3e2a0808,
  0xbea2be3e2a2a0808, 0xbebebeaa2a2a0808, 0xbea2bebe2a2a0808, 0xbea2a2be3e2a0808,
  0xbea2a2a23e3e0808, 0xbea2a2be3e2a0808, 0xbea2bebe2a2a0808, 0xbebebeaaaa2a0808,
  0xbea2bebeaa2a0808, 0xbea2a2bebe2a0808, 0xbea2a2a2be3e0808, 0xbea2a2bebe2a0808,
  0xbea2bebeaa2a0808, 0xbebebeaaaaaa0808, 0xbea2bebeaaaa0808, 0xbea2a2bebeaa0808,
  0xbea2a2a2bebe0808, 0xbea2a2a2a2be1c08, 0xbea2a2a2a2a21c1c, 0xbea2a2a2a222001c,
  0xbea2a2a22222001c, 0xbea2a2222222001c, 0xbea222222222001c, 0xbe2222222222001c,
  0x3e2222222222001c, 0x3e2222222222001c, 0x3e22222222221c1c, 0x3e222222223e1c08
};
const int IMAGES_LEN = sizeof(IMAGES) / sizeof(uint64_t);

LedControl display = LedControl(DIN_PIN, CLK_PIN, CS_PIN);


void setup() {
  display.clearDisplay(0);
  display.shutdown(0, false);
  display.setIntensity(0, 10);
}

void displayImage(uint64_t image) {
  for (int i = 0; i < 8; i++) {
    byte row = (image >> i * 8) & 0xFF;
    for (int j = 0; j < 8; j++) {
      display.setLed(0, i, j, bitRead(row, j));
    }
  }
}

int i = 0;

void loop() {
  displayImage(IMAGES[i]);
  if (++i >= IMAGES_LEN ) {
    i = 0;
  }
  delay(100);
}

Compile, upload and enjoy:

30 August, 2015

Arduino: manage 8-channel relay module via infrared remote control

Arduino allows us to do simple things in a simple way.

Pretty obvious desire - to control home electronics using the remote control: manage lighting, doors remotely by pressing the buttons. It is really easy. You just need these components:

Connect all together:

Arduino, 8-channel relay, IR remote control

Upload the source code to the Arduino board:

#include <IRremote.h>

const int IR_PIN = 2;

const int RELAY_PINS[8] = {12, 11, 10, 9, 8, 7, 6, 5};
int RELAY_STATES[8] = {LOW};

IRrecv irrecv(IR_PIN);

decode_results results;

void setup() {
  irrecv.enableIRIn();

  for (int i = 0; i < 8; i++) {
    pinMode(RELAY_PINS[i], OUTPUT);
  }
}

/**
 * Decode IR code to numeric button 0-9
 * Return pressed button number or -1
 */
int samsungDecode(unsigned long irValue) {
  switch (irValue) {
    case 0xE0E020DF:
      return 1;
    case 0xE0E0A05F:
      return 2;
    case 0xE0E0609F:
      return 3;
    case 0xE0E010EF:
      return 4;
    case 0xE0E0906F:
      return 5;
    case 0xE0E050AF:
      return 6;
    case 0xE0E030CF:
      return 7;
    case 0xE0E0B04F:
      return 8;
    case 0xE0E0708F:
      return 9;
    case 0xE0E08877:
      return 0;
  }
  return -1;
}

/**
 * Toggle single relay or switch ON/OFF all relays
 */
void action(int button) {
  if (button > 0 && button < 9) {
    //toggle single relay
    int i = button - 1;
    if (RELAY_STATES[i] == LOW) {
      digitalWrite(RELAY_PINS[i], HIGH);
      RELAY_STATES[i] = HIGH;
    } else {
      digitalWrite(RELAY_PINS[i], LOW);
      RELAY_STATES[i] = LOW;
    }
  } else if (button == 9) {
    //switch ON all relays
    for (int i = 0; i < 8; i++) {
      digitalWrite(RELAY_PINS[i], HIGH);
      RELAY_STATES[i] = HIGH;
    }
  } else if (button == 0) {
    //switch OFF all relays
    for (int i = 0; i < 8; i++) {
      digitalWrite(RELAY_PINS[i], LOW);
      RELAY_STATES[i] = LOW;
    }
  }
}

int lastPressedButton = -1;

void loop() {
  if (irrecv.decode(&results)) {
    int button = samsungDecode(results.value);
    if (button != lastPressedButton) {
      lastPressedButton = button;
      action(button);
    }
    irrecv.resume();
  } else {
    lastPressedButton = -1;
  }
  delay(250);
}

And enjoy by pressing buttons:

Buttons 1-8 manage relays 1-8, button 9 switch on all relays, and button 0 switch all off.

The previous day I wrote the article Arduino: scan codes from a remote control. I have scanned codes for my Samsung remote control. So if you have another remote control, just scan your codes.

29 August, 2015

Arduino: scan codes from a remote control

There are different types of infrared remote controls produced by different companies: for TV, DVD and other consumer electronics. As well all of them can be reused for Arduino using an infrared sensor.

Different remote controls may have different sets of codes, so first you need to determine what code is sent by each button. It is simple. Just connect IR sensor with Arduino:

Arduino Uno + IR sensor

Run this program:

#include <IRremote.h>

const int IR_PIN = 10;

IRrecv irrecv(IR_PIN);

decode_results results;

void setup() {
  Serial.begin(9600);  
  irrecv.enableIRIn();
}

char chars[9] = {};

void loop() {
  if (irrecv.decode(&results)) {
    Serial.println(results.value, HEX);
    irrecv.resume();
  }
  delay(100);
}

*It uses IRremote library.

Open serial monitor, press some buttons on the remote control and see the output:

Serial print scanned codes

Program prints codes for pressed buttons. For example, a remote control from the Samsung SmartTV sends these codes for numeric buttons:

  • E0E020DF 1
  • E0E0A05F 2
  • E0E0609F 3
  • E0E010EF 4
  • E0E0906F 5
  • E0E050AF 6
  • E0E030CF 7
  • E0E0B04F 8
  • E0E0708F 9
  • E0E08877 0

Arduino: print sensor value on the LED display

It is pretty simple to print a value from an analog sensor on the LED display.

For example from a light sensor like here:

Output light sensor value to led display

and when the sensor is out of light:

Output light sensor value to led display (closed)

Electronic components from the scheme above:

LED display is connected with Arduino via these 5 pins:

  • DIN - data in
  • CS - chip select
  • CLK - clock pulse source
  • GND
  • 5 V

DIN, CS and CLK are connected with Arduino via digital pins 7, 6 and 5.

Light sensor has 3 pins:

  • GND
  • 5V
  • Signal

where signal pin is connected with Arduino via the analog pin №1.

This program reads values from the sensor 10 times per second and displays the averaged result:

#include <LedControl.h>

const int DIN_PIN = 7;
const int CS_PIN = 6;
const int CLK_PIN = 5;

const int SENSOR_PIN = 1;

LedControl display = LedControl(DIN_PIN, CLK_PIN, CS_PIN);

void setup() {
  display.clearDisplay(0);
  display.shutdown(0, false);
  display.setIntensity(0, 10);
}

void displayNumber(int number) {
  display.clearDisplay(0);
  for (int i = 0; i < 8; i++) {
    int digit = number % 10;
    number /= 10;
    display.setDigit(0, i, digit, false);
    if (number == 0) {
      break;
    }
  }
}

void loop() {
  int value = 0;
  for (int i = 0; i < 10; i++) {
    value += analogRead(SENSOR_PIN);
    delay(100);
  }
  value /= 10;

  displayNumber(value);
}

22 July, 2015

Arduino: output multiple numbers to a digital LED display

In the previous article I was describing how to output number into this LED display:

But it is much interesting to display multiple numbers on a single LED module (for example: temperature and moisture or distance and time). It is pretty simple to write it in C.

Like in a previous example DIN, CS and CLK are connected with arduino through these pins: 7, 6 and 5. Here is the working prototype:

Output 2 numbers to led display

In this example are implemented two counters: 2-digits, and 5-digits. The first counter increments from 0 to 99, and then resets on reaching the maximum values. The second - reduces from 99999 to 0, and resets after the zero. In each cycle a digital display shows both numbers at the same time, with an empty place as a separator between them.

Code sample:

#include <LedControl.h>

const int DIN_PIN = 7;
const int CS_PIN = 6;
const int CLK_PIN = 5;

LedControl display = LedControl(DIN_PIN, CLK_PIN, CS_PIN);

void setup() {
  display.clearDisplay(0);
  display.shutdown(0, false);
  display.setIntensity(0, 10);
}

void displayString(const char *chars8) {
  display.clearDisplay(0);
  for (int i = 0; i < 8 && chars8[i] != 0; i++) {
    display.setChar(0, 7 - i, chars8[i], false);
  }
}

int counter1 = 0;
long counter2 = 99999;

char chars[9] = {};

void loop() {
  snprintf(chars, 9, "%-2d %5ld", counter1, counter2);
  displayString(chars);

  counter1++;
  counter2--;

  if (counter1 > 99) {
    counter1 = 0;
  }

  if (counter2 < 0) {
    counter2 = 99999;
  }

  delay(250);
}

In this example two numbers are packed into the char array and then displayed via the displayString() function. I use snprintf() function for this; it is much safe then sprintf().

The first number is aligned on the left edge of the display, the second - on the right.

This code requires LedControl library.

Set of components used in this example:

20 July, 2015

Arduino: output number into digital LED display MAX7219

There are some LED modules for Arduino to display numbers.

For example, this LED display with 8-digits based on the chip MAX7219:

It connects to the Arduino board via five pins:

  1. DIN - data in
  2. CS - chip select
  3. CLK - clock pulse source
  4. GND
  5. 5 V

In this example all elements are connected in this way:

Output number to led display

Here DIN, CS and CLK are connected with pins 7, 6 and 5.

Arduino site has a big LedControl article related to control over the LED matrix. But it doesn't contain a sample that shows how to output whole number.

The code below implements a simple counter, which increases its value once per second and displays it on a digital display:

#include <LedControl.h>

const int DIN_PIN = 7;
const int CS_PIN = 6;
const int CLK_PIN = 5;

LedControl display = LedControl(DIN_PIN, CLK_PIN, CS_PIN);

void setup() {
  display.clearDisplay(0);
  display.shutdown(0, false);
  display.setIntensity(0, 10);
}

void displayString(const char *chars8) {
  display.clearDisplay(0);
  for (int i = 0; i < 8 && chars8[i] != 0; i++) {
    display.setChar(0, 7 - i, chars8[i], false);
  }
}

int counter1 = 0;
long counter2 = 99999;

char chars[9] = {};

void loop() {
  snprintf(chars, 9, "%-2d %5ld", counter1, counter2);
  displayString(chars);

  counter1++;
  counter2--;

  if (counter1 > 99) {
    counter1 = 0;
  }

  if (counter2 < 0) {
    counter2 = 99999;
  }

  delay(250);
}

In this code I use displayNumber() function, that writes value for each decimal digit into the appropriate LED segment.

This code requires LedControl library.

Electronic components used in this example:

01 February, 2015

How to open sas7bdat file

I found Rocket Table application for this purpose. It doesn't require any SAS software, it's free and easy to use.
SAS Table Explorer allows you to open file in the .sas7bdat format and shows it as a table.

Main features of this application are:
  • Search over the whole dataset, or by specific columns
  • Highlight search results
  • Wildcard search
  • Truncate the analyzed dataset (to matched or selected rows)


Anyway this is the most compact tool for opening sas files.

07 January, 2015

How to close Java splash image after the application starts

There is a very easy way to get Splash screen in Java application.
With a "-splash:imagepath" command line parameter, or with "SplashScreen-Image: imagepath" manifest parameter.

But when an application is started, Java still shows this image (below the application layer, but it visible when you switching between the applications), until the application is finished. Strange behavior, but it is possible to close this kind of splash screen.

With these lines of code:
import java.awt.SplashScreen;
...
SplashScreen splashScreen = SplashScreen.getSplashScreen();
if (splashScreen != null) {
    splashScreen.close();
}

How to create a file extension association with the program in Windows

Assume that you have a program named "table-explorer.exe".
And you want to open all ".csv" and ".sas7bdat" files using  this program by default in Windows.

First you need to create a file extension association with the program via these commands:


reg add HKCU\SOFTWARE\Classes\.csv /d "table-explorer" /f
reg add HKCU\SOFTWARE\Classes\.sas7bdat /d "table-explorer" /f


And then register the application:


reg add HKCU\SOFTWARE\Classes\table-explorer\shell\open\command /d "\"C:\Path\to\table-explorer.exe\"" /f

06 January, 2015

How to bind hotkeys in Java FX

It is possible to create global keyboard shortcuts using a code like this:
import static javafx.scene.input.KeyCombination.keyCombination;
...
private void initHotkeys() {
    ObservableMap accelerators = stage.getScene().getAccelerators();
    accelerators.put(keyCombination("Alt+S"), searchTextField::requestFocus);
    accelerators.put(keyCombination("Alt+C"), columnsTextField::requestFocus);
    accelerators.put(keyCombination("Alt+O"), openFileButton::fire);
    accelerators.put(keyCombination("Alt+E"), exportButton::fire);
    accelerators.put(keyCombination("Alt+T"), truncateButton::fire);
    accelerators.put(keyCombination("Alt+H"), () -> filterChoiceBox.setValue(MATCH_HIGHLIGHT));
    accelerators.put(keyCombination("Alt+F"), () -> filterChoiceBox.setValue(MATCH_FILTER));
    accelerators.put(keyCombination("Alt+U"), () -> filterChoiceBox.setValue(MATCH_FILTER_UNIQUE));
    accelerators.put(keyCombination("Alt+D"), () -> {
        //todo some debug action
    });
}