Showing posts with label Arduino MAX7219. Show all posts

19 September, 2015

Arduino: LED Matrix state as array of bytes

Recently I released and have written about Arduino: LED Matrix Editor

This is online editor for LED dot matrices, that helps people to make animations and save them as C-code for Arduino. In that version was only option to save matrices as unsigned 64-bit integers (uint64_t). I prefer this form as the most compact representation of the 8x8 matrix.

However some people experiencing problems with uint64_t data type (due to limitation in their software or hardware). In order to support this case (and make them happy) I just added a new option to save images as arrays of bytes in binary form:
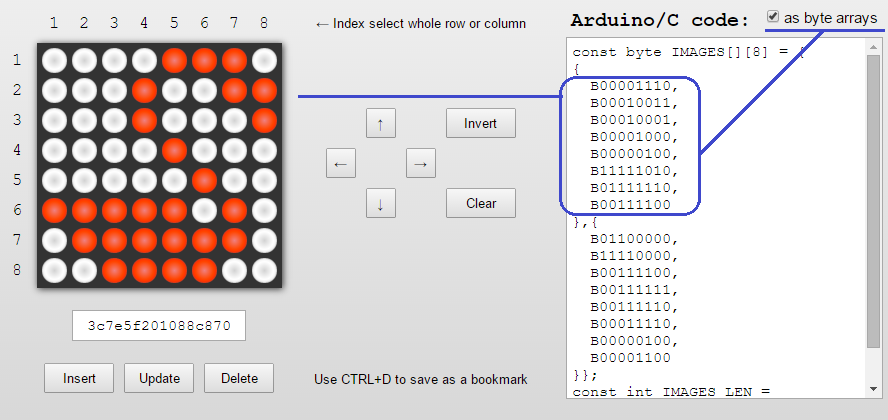
LED Matrix as byte array

Generated arrays take much more lines of code. But, nevertheless, they are more evident.

Here is a sample how to animate matrix using this code:

#include <LedControl.h>

const int DIN_PIN = 7;
const int CS_PIN = 6;
const int CLK_PIN = 5;

const byte IMAGES[][8] = {
  {
    B00010000,
    B00110000,
    B00010000,
    B00010000,
    B00010000,
    B00010000,
    B00010000,
    B00111000
  }, {
    B00111000,
    B01000100,
    B00000100,
    B00000100,
    B00001000,
    B00010000,
    B00100000,
    B01111100
  }, {
    B00111000,
    B01000100,
    B00000100,
    B00011000,
    B00000100,
    B00000100,
    B01000100,
    B00111000
  }, {
    B00000100,
    B00001100,
    B00010100,
    B00100100,
    B01000100,
    B01111100,
    B00000100,
    B00000100
  }, {
    B01111100,
    B01000000,
    B01000000,
    B01111000,
    B00000100,
    B00000100,
    B01000100,
    B00111000
  }, {
    B00111000,
    B01000100,
    B01000000,
    B01111000,
    B01000100,
    B01000100,
    B01000100,
    B00111000
  }, {
    B01111100,
    B00000100,
    B00000100,
    B00001000,
    B00010000,
    B00100000,
    B00100000,
    B00100000
  }, {
    B00111000,
    B01000100,
    B01000100,
    B00111000,
    B01000100,
    B01000100,
    B01000100,
    B00111000
  }, {
    B00111000,
    B01000100,
    B01000100,
    B01000100,
    B00111100,
    B00000100,
    B01000100,
    B00111000
  }, {
    B00111000,
    B01000100,
    B01000100,
    B01000100,
    B01000100,
    B01000100,
    B01000100,
    B00111000
  }
};

const int IMAGES_LEN = sizeof(IMAGES) / 8;

LedControl display = LedControl(DIN_PIN, CLK_PIN, CS_PIN);

void setup() {
  display.clearDisplay(0);
  display.shutdown(0, false);
  display.setIntensity(0, 5);
}

void displayImage(const byte* image) {
  for (int i = 0; i < 8; i++) {
    for (int j = 0; j < 8; j++) {
      display.setLed(0, i, j, bitRead(image[i], 7 - j));
    }
  }
}

int i = 0;

void loop() {
  displayImage(IMAGES[i]);
  if (++i >= IMAGES_LEN ) {
    i = 0;
  }
  delay(333);
}

Animation video:

12 September, 2015

Arduino: LED Matrix Editor

I would like to introduce my new mini-project LED Matrix Editor created for the Arduino community.

This is online tool for editing and creating animations for LED dot matrices.

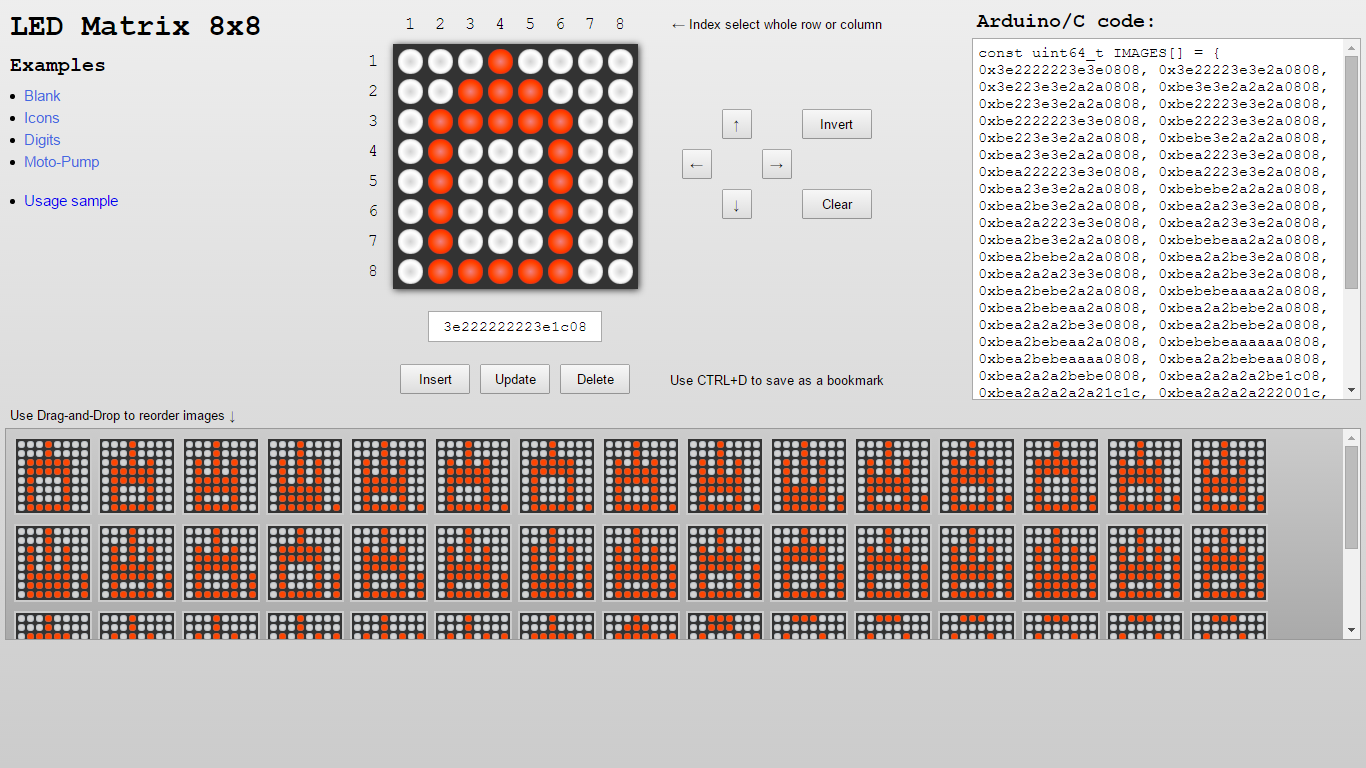
LED Matrix Editor screenshot

It looks very simple, but it has some handy features:

  • Toggle LEDs using a mouse
  • Toggle a whole row or column by clicking the appropriate matrix's index
  • Shift the matrix Up, Down, Left or Right via the single click
  • Invert or Clear matrix
  • Collect matrices in the bottom pane and then reorder them using the Drag-and-Drop
  • Update images as well as insert new or delete existing
  • Save images as a C code for Arduino
  • Use browsing history and save images as a link or bookmark, so you never lost your creations

I hope you will be fun and happy using it.

Assume you have a matrix (based on a board with MAX7219) like this:

*This chip it is really cool and there is a good LedControl library for Arduino for this chip.

Then you have created an animation using the online editor, copied and pasted generated code to the Arduino IDE:

#include <LedControl.h>

const int DIN_PIN = 7;
const int CS_PIN = 6;
const int CLK_PIN = 5;

const uint64_t IMAGES[] = {
  0x3e2222223e3e0808, 0x3e22223e3e2a0808, 0x3e223e3e2a2a0808, 0xbe3e3e2a2a2a0808,
  0xbe223e3e2a2a0808, 0xbe22223e3e2a0808, 0xbe2222223e3e0808, 0xbe22223e3e2a0808,
  0xbe223e3e2a2a0808, 0xbebe3e2a2a2a0808, 0xbea23e3e2a2a0808, 0xbea2223e3e2a0808,
  0xbea222223e3e0808, 0xbea2223e3e2a0808, 0xbea23e3e2a2a0808, 0xbebebe2a2a2a0808,
  0xbea2be3e2a2a0808, 0xbea2a23e3e2a0808, 0xbea2a2223e3e0808, 0xbea2a23e3e2a0808,
  0xbea2be3e2a2a0808, 0xbebebeaa2a2a0808, 0xbea2bebe2a2a0808, 0xbea2a2be3e2a0808,
  0xbea2a2a23e3e0808, 0xbea2a2be3e2a0808, 0xbea2bebe2a2a0808, 0xbebebeaaaa2a0808,
  0xbea2bebeaa2a0808, 0xbea2a2bebe2a0808, 0xbea2a2a2be3e0808, 0xbea2a2bebe2a0808,
  0xbea2bebeaa2a0808, 0xbebebeaaaaaa0808, 0xbea2bebeaaaa0808, 0xbea2a2bebeaa0808,
  0xbea2a2a2bebe0808, 0xbea2a2a2a2be1c08, 0xbea2a2a2a2a21c1c, 0xbea2a2a2a222001c,
  0xbea2a2a22222001c, 0xbea2a2222222001c, 0xbea222222222001c, 0xbe2222222222001c,
  0x3e2222222222001c, 0x3e2222222222001c, 0x3e22222222221c1c, 0x3e222222223e1c08
};
const int IMAGES_LEN = sizeof(IMAGES) / sizeof(uint64_t);

LedControl display = LedControl(DIN_PIN, CLK_PIN, CS_PIN);


void setup() {
  display.clearDisplay(0);
  display.shutdown(0, false);
  display.setIntensity(0, 10);
}

void displayImage(uint64_t image) {
  for (int i = 0; i < 8; i++) {
    byte row = (image >> i * 8) & 0xFF;
    for (int j = 0; j < 8; j++) {
      display.setLed(0, i, j, bitRead(row, j));
    }
  }
}

int i = 0;

void loop() {
  displayImage(IMAGES[i]);
  if (++i >= IMAGES_LEN ) {
    i = 0;
  }
  delay(100);
}

Compile, upload and enjoy:

29 August, 2015

Arduino: print sensor value on the LED display

It is pretty simple to print a value from an analog sensor on the LED display.

For example from a light sensor like here:

Output light sensor value to led display

and when the sensor is out of light:

Output light sensor value to led display (closed)

Electronic components from the scheme above:

LED display is connected with Arduino via these 5 pins:

  • DIN - data in
  • CS - chip select
  • CLK - clock pulse source
  • GND
  • 5 V

DIN, CS and CLK are connected with Arduino via digital pins 7, 6 and 5.

Light sensor has 3 pins:

  • GND
  • 5V
  • Signal

where signal pin is connected with Arduino via the analog pin №1.

This program reads values from the sensor 10 times per second and displays the averaged result:

#include <LedControl.h>

const int DIN_PIN = 7;
const int CS_PIN = 6;
const int CLK_PIN = 5;

const int SENSOR_PIN = 1;

LedControl display = LedControl(DIN_PIN, CLK_PIN, CS_PIN);

void setup() {
  display.clearDisplay(0);
  display.shutdown(0, false);
  display.setIntensity(0, 10);
}

void displayNumber(int number) {
  display.clearDisplay(0);
  for (int i = 0; i < 8; i++) {
    int digit = number % 10;
    number /= 10;
    display.setDigit(0, i, digit, false);
    if (number == 0) {
      break;
    }
  }
}

void loop() {
  int value = 0;
  for (int i = 0; i < 10; i++) {
    value += analogRead(SENSOR_PIN);
    delay(100);
  }
  value /= 10;

  displayNumber(value);
}

22 July, 2015

Arduino: output multiple numbers to a digital LED display

In the previous article I was describing how to output number into this LED display:

But it is much interesting to display multiple numbers on a single LED module (for example: temperature and moisture or distance and time). It is pretty simple to write it in C.

Like in a previous example DIN, CS and CLK are connected with arduino through these pins: 7, 6 and 5. Here is the working prototype:

Output 2 numbers to led display

In this example are implemented two counters: 2-digits, and 5-digits. The first counter increments from 0 to 99, and then resets on reaching the maximum values. The second - reduces from 99999 to 0, and resets after the zero. In each cycle a digital display shows both numbers at the same time, with an empty place as a separator between them.

Code sample:

#include <LedControl.h>

const int DIN_PIN = 7;
const int CS_PIN = 6;
const int CLK_PIN = 5;

LedControl display = LedControl(DIN_PIN, CLK_PIN, CS_PIN);

void setup() {
  display.clearDisplay(0);
  display.shutdown(0, false);
  display.setIntensity(0, 10);
}

void displayString(const char *chars8) {
  display.clearDisplay(0);
  for (int i = 0; i < 8 && chars8[i] != 0; i++) {
    display.setChar(0, 7 - i, chars8[i], false);
  }
}

int counter1 = 0;
long counter2 = 99999;

char chars[9] = {};

void loop() {
  snprintf(chars, 9, "%-2d %5ld", counter1, counter2);
  displayString(chars);

  counter1++;
  counter2--;

  if (counter1 > 99) {
    counter1 = 0;
  }

  if (counter2 < 0) {
    counter2 = 99999;
  }

  delay(250);
}

In this example two numbers are packed into the char array and then displayed via the displayString() function. I use snprintf() function for this; it is much safe then sprintf().

The first number is aligned on the left edge of the display, the second - on the right.

This code requires LedControl library.

Set of components used in this example:

20 July, 2015

Arduino: output number into digital LED display MAX7219

There are some LED modules for Arduino to display numbers.

For example, this LED display with 8-digits based on the chip MAX7219:

It connects to the Arduino board via five pins:

  1. DIN - data in
  2. CS - chip select
  3. CLK - clock pulse source
  4. GND
  5. 5 V

In this example all elements are connected in this way:

Output number to led display

Here DIN, CS and CLK are connected with pins 7, 6 and 5.

Arduino site has a big LedControl article related to control over the LED matrix. But it doesn't contain a sample that shows how to output whole number.

The code below implements a simple counter, which increases its value once per second and displays it on a digital display:

#include <LedControl.h>

const int DIN_PIN = 7;
const int CS_PIN = 6;
const int CLK_PIN = 5;

LedControl display = LedControl(DIN_PIN, CLK_PIN, CS_PIN);

void setup() {
  display.clearDisplay(0);
  display.shutdown(0, false);
  display.setIntensity(0, 10);
}

void displayString(const char *chars8) {
  display.clearDisplay(0);
  for (int i = 0; i < 8 && chars8[i] != 0; i++) {
    display.setChar(0, 7 - i, chars8[i], false);
  }
}

int counter1 = 0;
long counter2 = 99999;

char chars[9] = {};

void loop() {
  snprintf(chars, 9, "%-2d %5ld", counter1, counter2);
  displayString(chars);

  counter1++;
  counter2--;

  if (counter1 > 99) {
    counter1 = 0;
  }

  if (counter2 < 0) {
    counter2 = 99999;
  }

  delay(250);
}

In this code I use displayNumber() function, that writes value for each decimal digit into the appropriate LED segment.

This code requires LedControl library.

Electronic components used in this example: