Angle meter online


Imagine you have a data table with countries:
| Country code | Country name |
|---|---|
| HKG | Hong Kong |
| ISR | Israel |
| MYS | Malaysia |
And data table with languages related to these countries:
| Country code | Language | Percentage |
|---|---|---|
| HKG | Canton Chinese | 88.7 |
| HKG | Chiu chau | 1.4 |
| HKG | English | 2.2 |
| HKG | Fukien | 1.9 |
| HKG | Hakka | 1.6 |
| ISR | Arabic | 18.0 |
| ISR | Hebrew | 63.1 |
| ISR | Russian | 8.9 |
| MYS | Chinese | 9.0 |
| MYS | Dusun | 1.1 |
| MYS | English | 1.6 |
| MYS | Iban | 2.8 |
| MYS | Malay | 58.4 |
| MYS | Tamil | 3.9 |
Where "Country code" is the common field.
You would like to create link between these tables. It is possible to create relation manually in Spotfire, but for some reason you need to create it automatically via Python script.
def add_relation(table1, table2, link_expression):
    Document.Data.Relations.Add(
        Document.Data.Tables[table1],
        Document.Data.Tables[table2],
        link_expression)
Usage:
add_relation("country", "lang", "[lang].[Country code]=[country].[Country code]")
Now you are able to select country in the "country" table and all related languages from the "lang" table will also be selected.
Like here:

def get_relation(table1, table2):
    return Document.Data.Relations.FindRelation(
        Document.Data.Tables[table1],
        Document.Data.Tables[table2])
Usage:
print(get_relation("country", "lang").Expression)
# [lang].[Country code]=[country].[Country code]
def del_relation(table1, table2):
    relation = Document.Data.Relations.FindRelation(
        Document.Data.Tables[table1],
        Document.Data.Tables[table2])
    if relation:
        Document.Data.Relations.Remove(relation)
Usage:
del_relation("country", "lang")
See more about Spotfire on GitHub
Xantorohara, 2017-08-31, Spotfire 7.8.0
Just use this simple Python function:
def has_visualization(page_name, vis_name):
    for page in Document.Pages:
        if page.Title == page_name:
            for vis in page.Visuals:
                if vis.Title == vis_name:
                    return True
Try it:
print(has_visualization("SomePage", "SomeChart")) # True
print(has_visualization("SomePage", "ChartNotExists")) # None

See more about Spotfire on GitHub
Xantorohara, 2017-08-30, Spotfire 7.8.0
Just use this simple Python function:
def has_page(page_name):
    for page in Document.Pages:
        if page.Title == page_name:
            return True
Try it:
print(has_page("Page")) # True
print(has_page("Page (2)")) # True
print(has_page("SomePage")) # True
print(has_page("PageNotExists")) # None

See more about Spotfire on GitHub
Xantorohara, 2017-08-30, Spotfire 7.8.0
Spotfire uses auto-detection to set URL renderer for a table column. So, if all values in a column start with "http://" or "https://" it sets URL renderer.
Like here:

Moreover, it is possible to set URL renderer for columns in which the values do not look like URLs. But these values can be used as parameters for URLs.
Like here in the "Param Links" column:

The only step you need is to specify URL with a placeholder:

via "Table Properties->Columns"

Don't forget to choose "Link" as a "Renderer".
See more about Spotfire on GitHub
Xantorohara, 2017-08-30, Spotfire 7.8.0
Imagine that you have a table like this:
| Service Name | Service Id |
|---|---|
| Slack | slackhq |
| Travis CI | travis-ci |
| Zenhubio | zenhubio |
| Atom | atom |
And you would like to see icon images in the "Service Id" column.
You know there is a storage with images, with URLs like this:
https://assets-cdn.github.com/images/modules/site/integrators/${Service Id}.png
So, actually these images should be used instead of appropriate "Service Ids":
https://assets-cdn.github.com/images/modules/site/integrators/slackhq.png
https://assets-cdn.github.com/images/modules/site/integrators/travis-ci.png
https://assets-cdn.github.com/images/modules/site/integrators/zenhubio.png
https://assets-cdn.github.com/images/modules/site/integrators/atom.png
It is easy to achieve it in the Spotfire:

Now you have pretty images in Spotfire Table
See more on GitHub
Xantorohara, 2017-08-29, Spotfire 7.8.0
Recently I found that Spring Boot Maven plugin duplicates some dependencies in the output war file. The problem with time-stamped snapshot dependencies (they have versions like "1.1-20170206.160055-1"). In this case Spring Boot plugin puts both "1.1-SNAPSHOT" and "1.1-20170206.160055-1" versions of jars. Like here:
demo-webapp-1.1-20170206.160055-1.war:\WEB-INF\lib\
                        demo-core-1.1-SNAPSHOT.jar
                        demo-core-1.1-20170206.160055-1.jar
This is not critical (application will work), but unpleasant.
The problem occurs with a Spring Boot Maven plugin version before 1.4.4. With 1.4.4 it works fine. So just switch plugin to the 1.4.4, even if you use are using an earlier version of Spring Boot.
<plugins>
    <plugin>
        <groupId>org.springframework.boot</groupId>
        <artifactId>spring-boot-maven-plugin</artifactId>
        <version>1.4.4.RELEASE</version>
    </plugin>
...
After that it will keep only one file per dependency:
demo-webapp-1.1-20170206.160055-1.war:\WEB-INF\lib\
                        demo-core-1.1-SNAPSHOT.jar
parted --script /dev/sda mklabel msdos mkpart primary 0% 100% set 1 boot on print
mkfs.ext4 /dev/sda1
Edit /etc/pacman.d/mirrorlist file, move your preferred server to the top of the file
mount /dev/sda1 /mnt
pacstrap /mnt base
genfstab -p /mnt > /mnt/etc/fstab
arch-chroot /mnt
echo en_US.UTF-8 UTF-8 >/etc/locale.gen
localegen
echo LANG=en_US.UTF-8 >/etc/locale.conf
echo a1 >/etc/hostname
ln -s /usr/share/zoneinfo/UTC /etc/localtime
mkinitcpio -p linux
packman -S grub sudo mc bash-completion openssh
ip link
systemctl enable dhcpcd@enp0s3.service
systemctl enable sshd.service
useradd -m -g users -G wheel -s /bin/bash username
passwd username
grub-mkconfig -o /boot/grub/grub.cfg
grub-install /dev/sda
exit
umount /mnt
reboot
<?xml version="1.0" encoding="UTF-8"?>
<project xmlns="http://maven.apache.org/POM/4.0.0" xmlns:xsi="http://www.w3.org/2001/XMLSchema-instance"
    xsi:schemaLocation="http://maven.apache.org/POM/4.0.0 http://maven.apache.org/xsd/maven-4.0.0.xsd">
    <modelVersion>4.0.0</modelVersion>

    <groupId>io.github.xantorohara.springfield</groupId>
    <artifactId>spring-boot-sources</artifactId>
    <version>0.1</version>
    <packaging>pom</packaging>
    <name>spring-boot-sources</name>

    <parent>
        <groupId>org.springframework.boot</groupId>
        <artifactId>spring-boot-starter-parent</artifactId>
        <version>1.5.6.RELEASE</version>
        <relativePath/>
    </parent>

    <properties>
        <project.build.sourceEncoding>UTF-8</project.build.sourceEncoding>
        <project.reporting.outputEncoding>UTF-8</project.reporting.outputEncoding>
        <java.version>1.8</java.version>
    </properties>

    <dependencies>
        <!-- Spring Boot and Spring Framework libraries -->
        <dependency>
            <groupId>org.springframework.boot</groupId>
            <artifactId>spring-boot-starter-web</artifactId>
        </dependency>
        <dependency>
            <groupId>org.springframework.boot</groupId>
            <artifactId>spring-boot-starter-security</artifactId>
        </dependency>
        <dependency>
            <groupId>org.springframework.boot</groupId>
            <artifactId>spring-boot-starter-jdbc</artifactId>
        </dependency>
        <dependency>
            <groupId>org.springframework.boot</groupId>
            <artifactId>spring-boot-starter-data-jpa</artifactId>
        </dependency>
        <dependency>
            <groupId>org.springframework.boot</groupId>
            <artifactId>spring-boot-starter-cache</artifactId>
        </dependency>

        <!-- My current needs -->
        <dependency>
            <groupId>org.mybatis.spring.boot</groupId>
            <artifactId>mybatis-spring-boot-starter</artifactId>
            <version>1.2.0</version>
        </dependency>

    </dependencies>

    <build>
        <plugins>
            <plugin>
                <groupId>org.apache.maven.plugins</groupId>
                <artifactId>maven-dependency-plugin</artifactId>
                <version>3.0.0</version>
                <executions>
                    <execution>
                        <goals>
                            <goal>unpack-dependencies</goal>
                        </goals>
                        <configuration>
                            <classifier>sources</classifier>
                            <outputDirectory>target</outputDirectory>
                            <includeGroupIds>
                                org.springframework,
                                org.springframework.boot,
                                org.mybatis,
                                org.mybatis.spring.boot
                            </includeGroupIds>
                            <useSubDirectoryPerArtifact>true</useSubDirectoryPerArtifact>
                        </configuration>
                    </execution>
                </executions>
            </plugin>
        </plugins>
    </build>

</project>
mvn process-sources
Do you know how Oracle stores LOB data with "ENABLE STORAGE IN ROW" and "COMPRESS"/"NOCOMPRESS" options?
According to the Oracle documentation:
The maximum amount of LOB data stored in the row is the maximum VARCHAR2 size (4000). This includes the control information as well as the LOB value. If you indicate that the LOB should be stored in the row, once the LOB value and control information is larger than approximately 4000, then the LOB value is automatically moved out of the row.
Create test tablespaces and table:
-- DROP TABLESPACE XTEST_DAT INCLUDING CONTENTS AND DATAFILES;
-- DROP TABLESPACE XTEST_LOB INCLUDING CONTENTS AND DATAFILES;

CREATE TABLESPACE XTEST_DAT DATAFILE '/oracle_tablespaces/xtest_dat.dat' SIZE 10M AUTOEXTEND ON;
CREATE TABLESPACE XTEST_LOB DATAFILE '/oracle_tablespaces/xtest_lob.dat' SIZE 10M AUTOEXTEND ON;

CREATE TABLE xtest_text
(
  text CLOB
)
TABLESPACE XTEST_DAT
LOB (text) STORE AS SECUREFILE (
TABLESPACE XTEST_LOB ENABLE STORAGE IN ROW CHUNK 8192
NOCACHE LOGGING NOCOMPRESS KEEP_DUPLICATES
);
SQL for retrieving tablespaces size:
SELECT TABLESPACE_NAME, SUM(BYTES) BYTES
FROM USER_SEGMENTS
WHERE TABLESPACE_NAME LIKE 'XTEST_%'
GROUP BY TABLESPACE_NAME;
Rows generator:
-- INSERT INTO xtest_text VALUES ('1');
-- COMMIT;

DECLARE
  string CLOB;
  multiplier NUMBER:=1;
BEGIN
  FOR i IN 1..multiplier
  LOOP
    string:= string || dbms_random.string('A', 1000);
  END LOOP;

  FOR i IN 1..1000
  LOOP
    INSERT INTO xtest_text VALUES (string);
  END LOOP;
  COMMIT;
END;
Follow these steps:
Actual results:
With NOCOMPRESS option:
| Tablespace name | Tablespace size | Tablespace size | Tablespace size | Tablespace size |
|---|---|---|---|---|
| Inserted 1 row sizeof 1 byte | + 1000 rows size of 1K | + 1000 rows size of 10K | + 1000 rows size of 5K | |
| XTEST_LOB | 196608 | 196608 | 20185088 | 27525120 |
| XTEST_DAT | 65536 | 2097152 | 2097152 | 2097152 |
All records size of 1K (with size less than 4000 bytes) are stored in the DAT tablespace. All records size of 10K and 5K (with size more than 4000 bytes) are in the LOB tablespace.
With COMPRESS option:
| Tablespace name | Tablespace size | Tablespace size | Tablespace size | Tablespace size |
|---|---|---|---|---|
| Inserted 1 row sizeof 1 byte | + 1000 rows size of 1K | + 1000 rows size of 10K | + 1000 rows size of 5K | |
| XTEST_LOB | 196608 | 196608 | 10747904 | 10747904 |
| XTEST_DAT | 65536 | 1048576 | 2097152 | 9437184 |
All records size of 1K (with size less than 4000 bytes) are stored in the DAT tablespace. All records size of 10K (with compressed size more than 4000 bytes) are in the LOB tablespace and partially in DAT. All records size of 5K (with compressed size less than 4000 bytes) are stored in the DAT tablespace.
Nowadays developers don't think about bits, bytes or kilobytes.
How much memory is allocated for the object? Who the hell cares?!
Honestly speaking, modern software does fairly simple things, but it requires gigabytes of memory; much more than they actually needed.
But with Arduino each byte is under control. And I like it. Simple programs works in a simple way and requires reasonable amount of resources.
Modern Arduino (based on ATmega328P) has:
Much enough memory for good program )
It is possible to store the data in the Flash area via the PROGMEM modifier in the code. If you going to use the data from the Flash (PROGMEM) then you have to read it back into RAM.
I found it useful to keep 8x8 animation (created using the LED Matrix Editor) for LED dot matrix in the Flash instead of RAM. In my program each image is a 64-bit unsigned integer (uint64_t); an animation - is a series of these images.
const uint64_t IMAGES[] PROGMEM = {
  0x0000000000000000,
  0x7c92aa82aa827c00,
  0x7ceed6fed6fe7c00,
...
};
  uint64_t image;
  memcpy_P(&image, &IMAGES[i], 8);

  displayImage(image);
Just copy 8 (single uint64_t) bytes from the Flash to RAM.
Two sketches below show the small differences in the code, but big difference in memory usage.
#include <LedControl.h>

const int DIN_PIN = 7;
const int CS_PIN = 6;
const int CLK_PIN = 5;

const uint64_t IMAGES[] = {
  0x0000000000000000,
  0x7c92aa82aa827c00,
  0x7ceed6fed6fe7c00,
  0x10387cfefeee4400,
  0x10387cfe7c381000,
  0x381054fe54381000,
  0x38107cfe7c381000,
  0x00387c7c7c380000,
  0xffc7838383c7ffff,
  0x0038444444380000,
  0xffc7bbbbbbc7ffff,
  0x0c12129ca0c0f000,
  0x38444438107c1000,
  0x060e0c0808281800,
  0x066eecc88898f000,
  0x105438ee38541000,
  0x061e7efe7e1e0600,
  0xc0f0fcfefcf0c000,
  0x1038541054381000,
  0x6666006666666600,
  0xa0a0a0bca6a6fc00,
  0x0c324824124c3000,
  0xfefefe0000000000,
  0x7c38541054381000,
  0x383838fe7c381000,
  0x10387cfe38383800,
  0x10307efe7e301000,
  0x1018fcfefc181000,
  0xfefe0e0e0e000000,
  0x002844fe44280000,
  0xfefe7c7c38381000,
  0x1038387c7cfefe00,
  0x0000000000000000,
  0x180018183c3c1800,
  0x00000000286c6c00,
  0x6c6cfe6cfe6c6c00,
  0x103c403804781000,
  0x60660c1830660600,
  0xfc66a6143c663c00,
  0x0000000c18181800,
  0x060c1818180c0600,
  0x6030181818306000,
  0x006c38fe386c0000,
  0x0010107c10100000,
  0x060c0c0c00000000,
  0x0000003c00000000,
  0x0606000000000000,
  0x00060c1830600000,
  0x3c66666e76663c00,
  0x7e1818181c181800,
  0x7e060c3060663c00,
  0x3c66603860663c00,
  0x30307e3234383000,
  0x3c6660603e067e00,
  0x3c66663e06663c00,
  0x1818183030667e00,
  0x3c66663c66663c00,
  0x3c66607c66663c00,
  0x0018180018180000,
  0x0c18180018180000,
  0x6030180c18306000,
  0x00003c003c000000,
  0x060c1830180c0600,
  0x1800183860663c00,
  0x003c421a3a221c00,
  0x6666667e66663c00,
  0x3e66663e66663e00,
  0x3c66060606663c00,
  0x3e66666666663e00,
  0x7e06063e06067e00,
  0x0606063e06067e00,
  0x3c66760606663c00,
  0x6666667e66666600,
  0x3c18181818183c00,
  0x1c36363030307800,
  0x66361e0e1e366600,
  0x7e06060606060600,
  0xc6c6c6d6feeec600,
  0xc6c6e6f6decec600,
  0x3c66666666663c00,
  0x06063e6666663e00,
  0x603c766666663c00,
  0x66361e3e66663e00,
  0x3c66603c06663c00,
  0x18181818185a7e00,
  0x7c66666666666600,
  0x183c666666666600,
  0xc6eefed6c6c6c600,
  0xc6c66c386cc6c600,
  0x1818183c66666600,
  0x7e060c1830607e00,
  0x7818181818187800,
  0x006030180c060000,
  0x1e18181818181e00,
  0x0000008244281000,
  0xfe00000000000000,
  0x0000000060303000,
  0x7c667c603c000000,
  0x3e66663e06060600,
  0x3c6606663c000000,
  0x7c66667c60606000,
  0x3c067e663c000000,
  0x0c0c3e0c0c6c3800,
  0x3c607c66667c0000,
  0x6666663e06060600,
  0x3c18181800180000,
  0x1c36363030003000,
  0x66361e3666060600,
  0x1818181818181800,
  0xd6d6feeec6000000,
  0x6666667e3e000000,
  0x3c6666663c000000,
  0x06063e66663e0000,
  0xf0b03c36363c0000,
  0x060666663e000000,
  0x3e403c027c000000,
  0x1818187e18180000,
  0x7c66666666000000,
  0x183c666600000000,
  0x7cd6d6d6c6000000,
  0x663c183c66000000,
  0x3c607c6666000000,
  0x3c0c18303c000000,
  0x7018180c18187000,
  0x1818180018181800,
  0x0e18183018180e00,
  0x000000365c000000,
  0xfe8282c66c381000
};
const int IMAGES_LEN = sizeof(IMAGES)/8;


LedControl display = LedControl(DIN_PIN, CLK_PIN, CS_PIN);


void setup() {
  display.clearDisplay(0);
  display.shutdown(0, false);
  display.setIntensity(0, 10);
}

void displayImage(uint64_t image) {
  for (int i = 0; i < 8; i++) {
    byte row = (image >> i * 8) & 0xFF;
    for (int j = 0; j < 8; j++) {
      display.setLed(0, i, j, bitRead(row, j));
    }
  }
}

int i = 0;

void loop() {
  uint64_t image = IMAGES[i];

  displayImage(image);
  if (++i >= IMAGES_LEN ) {
    i = 0;
  }
  delay(1000);
}
Sketch uses 3,424 bytes (10%) of program storage space.
Maximum is 32,256 bytes.
Global variables use 1,123 bytes (54%) of dynamic memory,
leaving 925 bytes for local variables. Maximum is 2,048 bytes.
#include <LedControl.h>

const int DIN_PIN = 7;
const int CS_PIN = 6;
const int CLK_PIN = 5;

const uint64_t IMAGES[] PROGMEM = {
  0x0000000000000000,
  0x7c92aa82aa827c00,
  0x7ceed6fed6fe7c00,
  0x10387cfefeee4400,
  0x10387cfe7c381000,
  0x381054fe54381000,
  0x38107cfe7c381000,
  0x00387c7c7c380000,
  0xffc7838383c7ffff,
  0x0038444444380000,
  0xffc7bbbbbbc7ffff,
  0x0c12129ca0c0f000,
  0x38444438107c1000,
  0x060e0c0808281800,
  0x066eecc88898f000,
  0x105438ee38541000,
  0x061e7efe7e1e0600,
  0xc0f0fcfefcf0c000,
  0x1038541054381000,
  0x6666006666666600,
  0xa0a0a0bca6a6fc00,
  0x0c324824124c3000,
  0xfefefe0000000000,
  0x7c38541054381000,
  0x383838fe7c381000,
  0x10387cfe38383800,
  0x10307efe7e301000,
  0x1018fcfefc181000,
  0xfefe0e0e0e000000,
  0x002844fe44280000,
  0xfefe7c7c38381000,
  0x1038387c7cfefe00,
  0x0000000000000000,
  0x180018183c3c1800,
  0x00000000286c6c00,
  0x6c6cfe6cfe6c6c00,
  0x103c403804781000,
  0x60660c1830660600,
  0xfc66a6143c663c00,
  0x0000000c18181800,
  0x060c1818180c0600,
  0x6030181818306000,
  0x006c38fe386c0000,
  0x0010107c10100000,
  0x060c0c0c00000000,
  0x0000003c00000000,
  0x0606000000000000,
  0x00060c1830600000,
  0x3c66666e76663c00,
  0x7e1818181c181800,
  0x7e060c3060663c00,
  0x3c66603860663c00,
  0x30307e3234383000,
  0x3c6660603e067e00,
  0x3c66663e06663c00,
  0x1818183030667e00,
  0x3c66663c66663c00,
  0x3c66607c66663c00,
  0x0018180018180000,
  0x0c18180018180000,
  0x6030180c18306000,
  0x00003c003c000000,
  0x060c1830180c0600,
  0x1800183860663c00,
  0x003c421a3a221c00,
  0x6666667e66663c00,
  0x3e66663e66663e00,
  0x3c66060606663c00,
  0x3e66666666663e00,
  0x7e06063e06067e00,
  0x0606063e06067e00,
  0x3c66760606663c00,
  0x6666667e66666600,
  0x3c18181818183c00,
  0x1c36363030307800,
  0x66361e0e1e366600,
  0x7e06060606060600,
  0xc6c6c6d6feeec600,
  0xc6c6e6f6decec600,
  0x3c66666666663c00,
  0x06063e6666663e00,
  0x603c766666663c00,
  0x66361e3e66663e00,
  0x3c66603c06663c00,
  0x18181818185a7e00,
  0x7c66666666666600,
  0x183c666666666600,
  0xc6eefed6c6c6c600,
  0xc6c66c386cc6c600,
  0x1818183c66666600,
  0x7e060c1830607e00,
  0x7818181818187800,
  0x006030180c060000,
  0x1e18181818181e00,
  0x0000008244281000,
  0xfe00000000000000,
  0x0000000060303000,
  0x7c667c603c000000,
  0x3e66663e06060600,
  0x3c6606663c000000,
  0x7c66667c60606000,
  0x3c067e663c000000,
  0x0c0c3e0c0c6c3800,
  0x3c607c66667c0000,
  0x6666663e06060600,
  0x3c18181800180000,
  0x1c36363030003000,
  0x66361e3666060600,
  0x1818181818181800,
  0xd6d6feeec6000000,
  0x6666667e3e000000,
  0x3c6666663c000000,
  0x06063e66663e0000,
  0xf0b03c36363c0000,
  0x060666663e000000,
  0x3e403c027c000000,
  0x1818187e18180000,
  0x7c66666666000000,
  0x183c666600000000,
  0x7cd6d6d6c6000000,
  0x663c183c66000000,
  0x3c607c6666000000,
  0x3c0c18303c000000,
  0x7018180c18187000,
  0x1818180018181800,
  0x0e18183018180e00,
  0x000000365c000000,
  0xfe8282c66c381000
};
const int IMAGES_LEN = sizeof(IMAGES)/8;


LedControl display = LedControl(DIN_PIN, CLK_PIN, CS_PIN);


void setup() {
  display.clearDisplay(0);
  display.shutdown(0, false);
  display.setIntensity(0, 10);
}

void displayImage(uint64_t image) {
  for (int i = 0; i < 8; i++) {
    byte row = (image >> i * 8) & 0xFF;
    for (int j = 0; j < 8; j++) {
      display.setLed(0, i, j, bitRead(row, j));
    }
  }
}

int i = 0;

void loop() {
  uint64_t image;
  memcpy_P(&image, &IMAGES[i], 8);

  displayImage(image);
  if (++i >= IMAGES_LEN ) {
    i = 0;
  }
  delay(1000);
}
Sketch uses 3,470 bytes (10%) of program storage space.
Maximum is 32,256 bytes.
Global variables use 99 bytes (4%) of dynamic memory,
leaving 1,949 bytes for local variables. Maximum is 2,048 bytes.
As you can see - the second (PROGMEM) program uses more than 10 times less RAM memory than the first.
Recently I released and have written about Arduino: LED Matrix Editor
This is online editor for LED dot matrices, that helps people to make animations and save them as C-code for Arduino. In that version was only option to save matrices as unsigned 64-bit integers (uint64_t). I prefer this form as the most compact representation of the 8x8 matrix.
However some people experiencing problems with uint64_t data type (due to limitation in their software or hardware). In order to support this case (and make them happy) I just added a new option to save images as arrays of bytes in binary form:
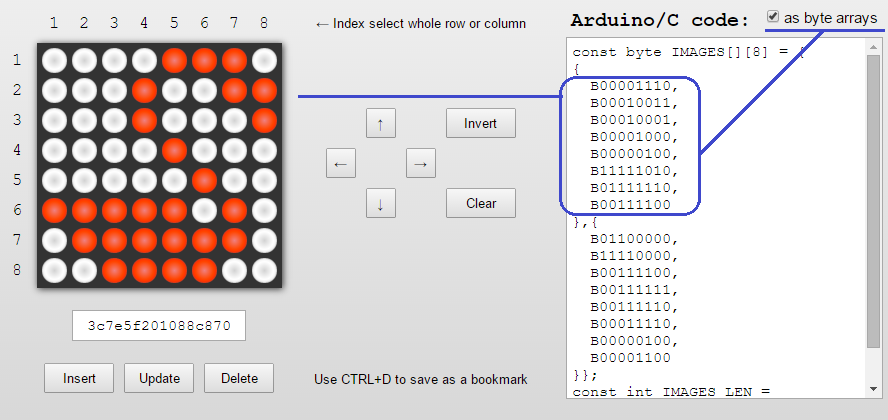
Generated arrays take much more lines of code. But, nevertheless, they are more evident.
Here is a sample how to animate matrix using this code:
#include <LedControl.h>

const int DIN_PIN = 7;
const int CS_PIN = 6;
const int CLK_PIN = 5;

const byte IMAGES[][8] = {
  {
    B00010000,
    B00110000,
    B00010000,
    B00010000,
    B00010000,
    B00010000,
    B00010000,
    B00111000
  }, {
    B00111000,
    B01000100,
    B00000100,
    B00000100,
    B00001000,
    B00010000,
    B00100000,
    B01111100
  }, {
    B00111000,
    B01000100,
    B00000100,
    B00011000,
    B00000100,
    B00000100,
    B01000100,
    B00111000
  }, {
    B00000100,
    B00001100,
    B00010100,
    B00100100,
    B01000100,
    B01111100,
    B00000100,
    B00000100
  }, {
    B01111100,
    B01000000,
    B01000000,
    B01111000,
    B00000100,
    B00000100,
    B01000100,
    B00111000
  }, {
    B00111000,
    B01000100,
    B01000000,
    B01111000,
    B01000100,
    B01000100,
    B01000100,
    B00111000
  }, {
    B01111100,
    B00000100,
    B00000100,
    B00001000,
    B00010000,
    B00100000,
    B00100000,
    B00100000
  }, {
    B00111000,
    B01000100,
    B01000100,
    B00111000,
    B01000100,
    B01000100,
    B01000100,
    B00111000
  }, {
    B00111000,
    B01000100,
    B01000100,
    B01000100,
    B00111100,
    B00000100,
    B01000100,
    B00111000
  }, {
    B00111000,
    B01000100,
    B01000100,
    B01000100,
    B01000100,
    B01000100,
    B01000100,
    B00111000
  }
};

const int IMAGES_LEN = sizeof(IMAGES) / 8;

LedControl display = LedControl(DIN_PIN, CLK_PIN, CS_PIN);

void setup() {
  display.clearDisplay(0);
  display.shutdown(0, false);
  display.setIntensity(0, 5);
}

void displayImage(const byte* image) {
  for (int i = 0; i < 8; i++) {
    for (int j = 0; j < 8; j++) {
      display.setLed(0, i, j, bitRead(image[i], 7 - j));
    }
  }
}

int i = 0;

void loop() {
  displayImage(IMAGES[i]);
  if (++i >= IMAGES_LEN ) {
    i = 0;
  }
  delay(333);
}
Animation video:
I would like to introduce my new mini-project LED Matrix Editor created for the Arduino community.
This is online tool for editing and creating animations for LED dot matrices.
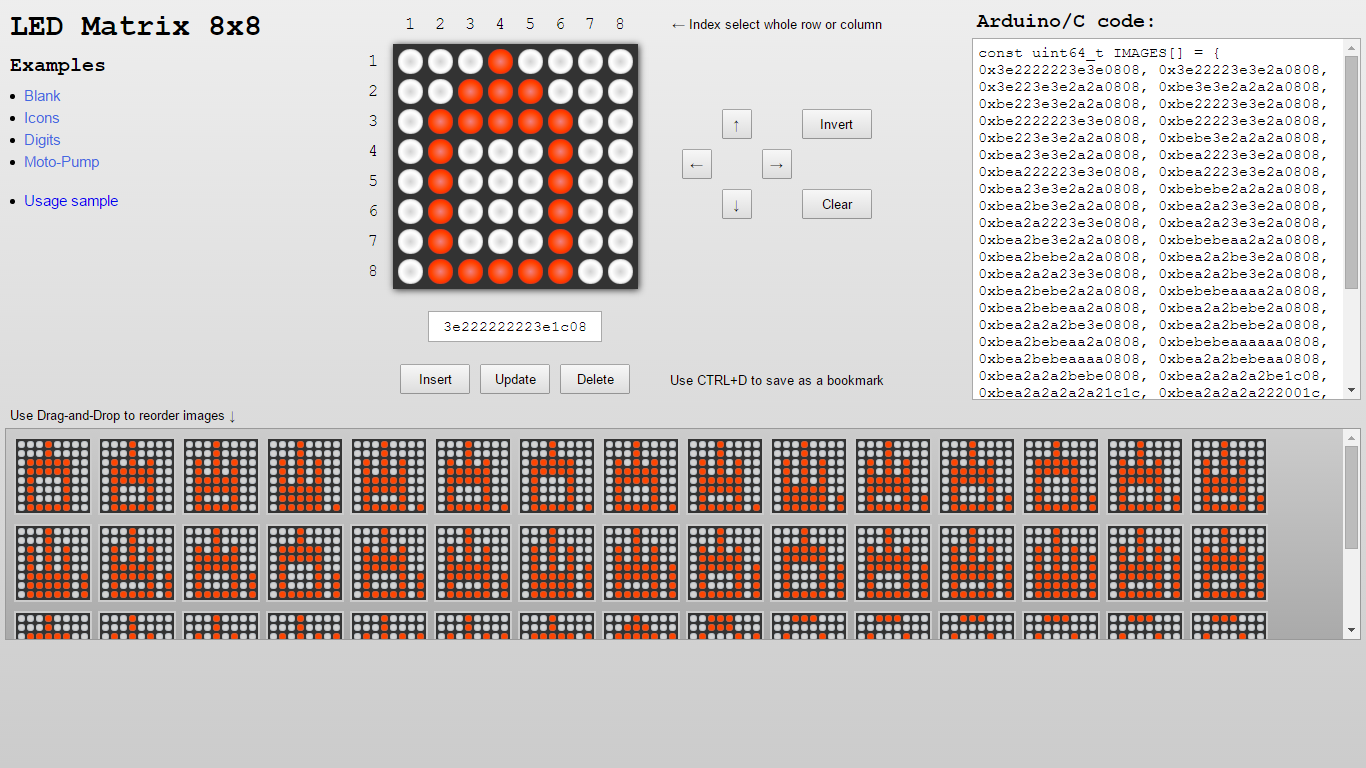
It looks very simple, but it has some handy features:
I hope you will be fun and happy using it.
Assume you have a matrix (based on a board with MAX7219) like this:
*This chip it is really cool and there is a good LedControl library for Arduino for this chip.
Then you have created an animation using the online editor, copied and pasted generated code to the Arduino IDE:
#include <LedControl.h>

const int DIN_PIN = 7;
const int CS_PIN = 6;
const int CLK_PIN = 5;

const uint64_t IMAGES[] = {
  0x3e2222223e3e0808, 0x3e22223e3e2a0808, 0x3e223e3e2a2a0808, 0xbe3e3e2a2a2a0808,
  0xbe223e3e2a2a0808, 0xbe22223e3e2a0808, 0xbe2222223e3e0808, 0xbe22223e3e2a0808,
  0xbe223e3e2a2a0808, 0xbebe3e2a2a2a0808, 0xbea23e3e2a2a0808, 0xbea2223e3e2a0808,
  0xbea222223e3e0808, 0xbea2223e3e2a0808, 0xbea23e3e2a2a0808, 0xbebebe2a2a2a0808,
  0xbea2be3e2a2a0808, 0xbea2a23e3e2a0808, 0xbea2a2223e3e0808, 0xbea2a23e3e2a0808,
  0xbea2be3e2a2a0808, 0xbebebeaa2a2a0808, 0xbea2bebe2a2a0808, 0xbea2a2be3e2a0808,
  0xbea2a2a23e3e0808, 0xbea2a2be3e2a0808, 0xbea2bebe2a2a0808, 0xbebebeaaaa2a0808,
  0xbea2bebeaa2a0808, 0xbea2a2bebe2a0808, 0xbea2a2a2be3e0808, 0xbea2a2bebe2a0808,
  0xbea2bebeaa2a0808, 0xbebebeaaaaaa0808, 0xbea2bebeaaaa0808, 0xbea2a2bebeaa0808,
  0xbea2a2a2bebe0808, 0xbea2a2a2a2be1c08, 0xbea2a2a2a2a21c1c, 0xbea2a2a2a222001c,
  0xbea2a2a22222001c, 0xbea2a2222222001c, 0xbea222222222001c, 0xbe2222222222001c,
  0x3e2222222222001c, 0x3e2222222222001c, 0x3e22222222221c1c, 0x3e222222223e1c08
};
const int IMAGES_LEN = sizeof(IMAGES) / sizeof(uint64_t);

LedControl display = LedControl(DIN_PIN, CLK_PIN, CS_PIN);


void setup() {
  display.clearDisplay(0);
  display.shutdown(0, false);
  display.setIntensity(0, 10);
}

void displayImage(uint64_t image) {
  for (int i = 0; i < 8; i++) {
    byte row = (image >> i * 8) & 0xFF;
    for (int j = 0; j < 8; j++) {
      display.setLed(0, i, j, bitRead(row, j));
    }
  }
}

int i = 0;

void loop() {
  displayImage(IMAGES[i]);
  if (++i >= IMAGES_LEN ) {
    i = 0;
  }
  delay(100);
}
Compile, upload and enjoy:
Arduino allows us to do simple things in a simple way.
Pretty obvious desire - to control home electronics using the remote control: manage lighting, doors remotely by pressing the buttons. It is really easy. You just need these components:
Connect all together:

Upload the source code to the Arduino board:
#include <IRremote.h>

const int IR_PIN = 2;

const int RELAY_PINS[8] = {12, 11, 10, 9, 8, 7, 6, 5};
int RELAY_STATES[8] = {LOW};

IRrecv irrecv(IR_PIN);

decode_results results;

void setup() {
  irrecv.enableIRIn();

  for (int i = 0; i < 8; i++) {
    pinMode(RELAY_PINS[i], OUTPUT);
  }
}

/**
 * Decode IR code to numeric button 0-9
 * Return pressed button number or -1
 */
int samsungDecode(unsigned long irValue) {
  switch (irValue) {
    case 0xE0E020DF:
      return 1;
    case 0xE0E0A05F:
      return 2;
    case 0xE0E0609F:
      return 3;
    case 0xE0E010EF:
      return 4;
    case 0xE0E0906F:
      return 5;
    case 0xE0E050AF:
      return 6;
    case 0xE0E030CF:
      return 7;
    case 0xE0E0B04F:
      return 8;
    case 0xE0E0708F:
      return 9;
    case 0xE0E08877:
      return 0;
  }
  return -1;
}

/**
 * Toggle single relay or switch ON/OFF all relays
 */
void action(int button) {
  if (button > 0 && button < 9) {
    //toggle single relay
    int i = button - 1;
    if (RELAY_STATES[i] == LOW) {
      digitalWrite(RELAY_PINS[i], HIGH);
      RELAY_STATES[i] = HIGH;
    } else {
      digitalWrite(RELAY_PINS[i], LOW);
      RELAY_STATES[i] = LOW;
    }
  } else if (button == 9) {
    //switch ON all relays
    for (int i = 0; i < 8; i++) {
      digitalWrite(RELAY_PINS[i], HIGH);
      RELAY_STATES[i] = HIGH;
    }
  } else if (button == 0) {
    //switch OFF all relays
    for (int i = 0; i < 8; i++) {
      digitalWrite(RELAY_PINS[i], LOW);
      RELAY_STATES[i] = LOW;
    }
  }
}

int lastPressedButton = -1;

void loop() {
  if (irrecv.decode(&results)) {
    int button = samsungDecode(results.value);
    if (button != lastPressedButton) {
      lastPressedButton = button;
      action(button);
    }
    irrecv.resume();
  } else {
    lastPressedButton = -1;
  }
  delay(250);
}
And enjoy by pressing buttons:
Buttons 1-8 manage relays 1-8, button 9 switch on all relays, and button 0 switch all off.
The previous day I wrote the article Arduino: scan codes from a remote control. I have scanned codes for my Samsung remote control. So if you have another remote control, just scan your codes.
There are different types of infrared remote controls produced by different companies: for TV, DVD and other consumer electronics. As well all of them can be reused for Arduino using an infrared sensor.
Different remote controls may have different sets of codes, so first you need to determine what code is sent by each button. It is simple. Just connect IR sensor with Arduino:

Run this program:
#include <IRremote.h>

const int IR_PIN = 10;

IRrecv irrecv(IR_PIN);

decode_results results;

void setup() {
  Serial.begin(9600);
  irrecv.enableIRIn();
}

char chars[9] = {};

void loop() {
  if (irrecv.decode(&results)) {
    Serial.println(results.value, HEX);
    irrecv.resume();
  }
  delay(100);
}
*It uses IRremote library.
Open serial monitor, press some buttons on the remote control and see the output:

Program prints codes for pressed buttons. For example, a remote control from the Samsung SmartTV sends these codes for numeric buttons:
It is pretty simple to print a value from an analog sensor on the LED display.
For example from a light sensor like here:

and when the sensor is out of light:

Electronic components from the scheme above:
LED display is connected with Arduino via these 5 pins:
DIN, CS and CLK are connected with Arduino via digital pins 7, 6 and 5.
Light sensor has 3 pins:
where signal pin is connected with Arduino via the analog pin №1.
This program reads values from the sensor 10 times per second and displays the averaged result:
#include <LedControl.h>

const int DIN_PIN = 7;
const int CS_PIN = 6;
const int CLK_PIN = 5;

const int SENSOR_PIN = 1;

LedControl display = LedControl(DIN_PIN, CLK_PIN, CS_PIN);

void setup() {
  display.clearDisplay(0);
  display.shutdown(0, false);
  display.setIntensity(0, 10);
}

void displayNumber(int number) {
  display.clearDisplay(0);
  for (int i = 0; i < 8; i++) {
    int digit = number % 10;
    number /= 10;
    display.setDigit(0, i, digit, false);
    if (number == 0) {
      break;
    }
  }
}

void loop() {
  int value = 0;
  for (int i = 0; i < 10; i++) {
    value += analogRead(SENSOR_PIN);
    delay(100);
  }
  value /= 10;

  displayNumber(value);
}
In the previous article I was describing how to output number into this LED display:
But it is much interesting to display multiple numbers on a single LED module (for example: temperature and moisture or distance and time). It is pretty simple to write it in C.
Like in a previous example DIN, CS and CLK are connected with arduino through these pins: 7, 6 and 5. Here is the working prototype:

In this example are implemented two counters: 2-digits, and 5-digits. The first counter increments from 0 to 99, and then resets on reaching the maximum values. The second - reduces from 99999 to 0, and resets after the zero. In each cycle a digital display shows both numbers at the same time, with an empty place as a separator between them.
Code sample:
#include <LedControl.h>

const int DIN_PIN = 7;
const int CS_PIN = 6;
const int CLK_PIN = 5;

LedControl display = LedControl(DIN_PIN, CLK_PIN, CS_PIN);

void setup() {
  display.clearDisplay(0);
  display.shutdown(0, false);
  display.setIntensity(0, 10);
}

void displayString(const char *chars8) {
  display.clearDisplay(0);
  for (int i = 0; i < 8 && chars8[i] != 0; i++) {
    display.setChar(0, 7 - i, chars8[i], false);
  }
}

int counter1 = 0;
long counter2 = 99999;

char chars[9] = {};

void loop() {
  snprintf(chars, 9, "%-2d %5ld", counter1, counter2);
  displayString(chars);

  counter1++;
  counter2--;

  if (counter1 > 99) {
    counter1 = 0;
  }

  if (counter2 < 0) {
    counter2 = 99999;
  }

  delay(250);
}
In this example two numbers are packed into the char array and then displayed via the displayString() function.
I use snprintf() function for this; it is much safe then sprintf().
The first number is aligned on the left edge of the display, the second - on the right.
This code requires LedControl library.
Set of components used in this example:


